VCC, VSS and VEE:
RS (REGISTER SELECT):
RW (READ/WRITE):
EN (Enable):
D0-D7 (DATA LINES):
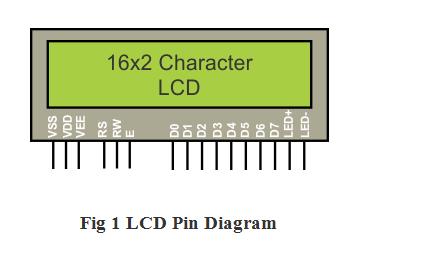
Pin configuration:

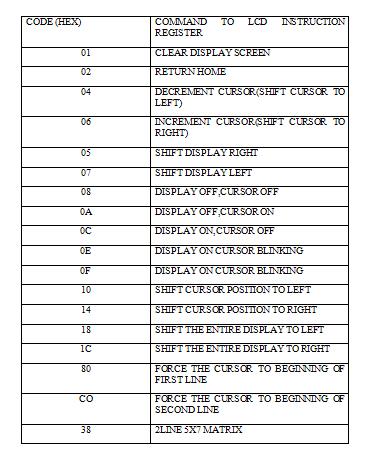
LCD COMMAND CODES:
Programming the LCD:
Application Ideas:
/*  Name     : main.c
 *  Purpose  : Source code for LCD Interfacing with AT89C52.
 *  Author   : Gemicates
 *  Date     : 2014-01-15
 *  Website  : www.gemicates.org
 *  Revision : None
 */

#include <REGX52.H>

#define Lcdport P
sbit rs = P3^7;  					       // register select pin
sbit rw = P3^6;  					       // read write pin
sbit en = P3^5;  					       // enable pin

//Function declarations
void delay(unsigned int MS);
void lcdcmd_address(unsigned char cmd);
void lcddata(unsigned char send_data);
void lcd(unsigned char str[10]);
void lcd_data_string(unsigned char *str);

void main()
{
	lcdcmd_address(0x38);  				      // for using 8-bit 2 row mode and 5x7 Dots of LCD
	delay(10);
	lcdcmd_address(0x0E);  				      // turn display ON for cursor blinking
	delay(10);
	lcdcmd_address(0x0C);				      // Display On cursor Off
	delay(10);
	lcdcmd_address(0x01);  				      // clear screen
	delay(10);
	lcdcmd_address(0x06);  				      // display ON
	delay(10);

	//	lcdcmd_address(0x08);  			      // display OFF
	//	delay(10);
	//	lcdcmd_address(0x0F);  			      // display On cursor blinking
	//	delay(10);

		lcdcmd_address(0x86);  			      // bring cursor to position 6 of ROW 1
		lcddata('H');
		lcdcmd_address(0x87);
		lcddata('I');
		lcddata('!');
		delay(10);
		lcdcmd_address(0xC3);			      // bring cursor to position 3 of ROW 2
		lcd("**GUYS**");
		delay(50);
		lcdcmd_address(0x01);  			      // clear screen

	//	delay(10);
	//	lcdcmd_address(0x10);			      // move cursor left by one character
	//	delay(10);
	//	lcdcmd_address(0x14);			      // move cursor right by one character
	//	delay(10);

		lcdcmd_address(0x83);			      // bring cursor to position 3 of ROW 1
		lcd("WELCOME TO");
		delay(100);
		lcdcmd_address(0xC3);			      // bring cursor to position 3 of ROW 2
		lcd("GEMICATES");
		lcdcmd_address(0x01);  			      // clear screen

	while(1)
	{
		lcdcmd_address(0x80);
		lcd("PROGRESS THROUGH");
		lcdcmd_address(0x1C);			      // shift entire display left
		lcdcmd_address(0xC3);
		lcd("INNOVATION");
		lcdcmd_address(0x18);			      // shift entire display right
	}
}

void delay(unsigned int MS)  				      // Time delay function in milli seconds.
{
	int m,n;
	for(m=0; m<MS; m++)
	for(n=0;n<1275;n++);
}

void lcdcmd_address(unsigned char cmd)  	              // Function to send command to LCD
{
	Lcdport = cmd;
	rs= 0;
	rw= 0;
	en= 1;
	delay(5);
	en= 0;
	return;
}

void lcddata(unsigned char send_data)  		              // Function to send data to LCD
{
	Lcdport = send_data;
	rs= 1;
	rw=0;
	en=1;
	delay(5);
	en=0;
	return;
}
void lcd(unsigned char str[10])  	                      // Funtion to Initialize LCD
{
lcd_data_string(str);
}

void lcd_data_string(unsigned char *str)                      // Function to send string on LCD
{
int i=0;
	while(str[i]!='\0')
	{
		lcddata(str[i]);
		i++;
		delay(10);
	}
return;
}

Interfacing of LCD with 8051